What is the correct white balance for Aurora photography?
Like almost all answers to questions about photography it starts with "It depends."
First of all there is hardly any such thing as "correct white balance" in any photograph. It is an esthetic choice. What do you want to communicate? What kind of mood do you want? and, what feels right to you? Two photographers may very well interpret the same situation and scene differently. To learn more about white balance visit this article on how to get it right.
2 things I go for
1 - I want the photograph to look close to what I saw in the nature.
2 - I want the photograph to feel as how I felt it. In the winter that mostly means "cold."
The night it got complicated
Saturday March 7, things got more complicated than usual.
My normal standards are 4000 Kelvin in moonlight, and 3200 Kelvin on nights without moonlight. Or tungsten/incandescent setting for no moon, and fluorescent setting for moonlight.
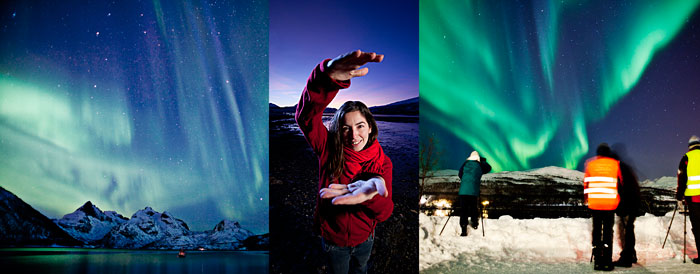
Now that we have reached March the days are much longer than January and February. That means that in the beginning of the night there is still a lot of daylight. The sun sat at 17:08 that night. But, here in the north the sun sets at such an angle that it takes a long time from it sets until it gets really dark. Astro twilight lasted until 20:37 that night. So when we got out of the studio at 19:00 it was still twilight. There was also another type of light: Northern Light. The photo below is shot from the field across the road from the studio on Håkøya.
The white balance settings are very different from twilight to night. The twilight is also called "The blue hour."
The time right after sunset can be seen as if we are entering the shadow side of the earth. The sun is still lighting up the sky making it very strong in the color blue. Because I shoot in RAW, I can always change the white balance in the computer afterwards. For the above image I set it to 7417 Kelvin, which is close to the shadow setting in the camera. Notice how the sky looks natural but, the street light lit clouds look very orange. (other settings: Tint: -44, Saturation: -6)
We moved down to the beach to get some better shots.
A half an hour later the sun had set a little more. It was still twilight yet, darker and, I changed the WB setting. Notice how the clouds are slightly less orange on the photograph above. Yet the sky is almost the same as the previous photo. The setting here were 4288 Kelvin, Tint: -25, Saturation -6. Thus the white balance on this photo is set close to fluorescent setting in the camera.
 |
| Aurora showing up early at night, late in the season. Photo taken at 19:05. |
The time right after sunset can be seen as if we are entering the shadow side of the earth. The sun is still lighting up the sky making it very strong in the color blue. Because I shoot in RAW, I can always change the white balance in the computer afterwards. For the above image I set it to 7417 Kelvin, which is close to the shadow setting in the camera. Notice how the sky looks natural but, the street light lit clouds look very orange. (other settings: Tint: -44, Saturation: -6)
We moved down to the beach to get some better shots.
 |
| A little later at night: 19:32 |
The clouds moved in and we started driving, after an hour we saw this:
 |
| Later yet, but before the moon was really up: 20:50. |
The moon came above the horizon at 19:56 according to timeanddate.com. That does not mean it's above the high mountains around Tromsø. On the above photo I'm almost back to my old standard for Aurora photos without moonshine: 3400 Kelvin, Tint: +7, Saturation -6. Notice that the clouds only have a slight tint of orange. That is caused both by the white balance setting and that the street lights are further away.
We kept on driving in search of a cloud free sky and ended up in Finland. At the time the photo below was shot the moon was shining bright and I hid it behind the trunk of a tree to avoid lens flare.
 |
| Late at night, or shall we say early morning: 00:33. |
Here the almost full moon (98,7%). was shining bright. The settings had to be changed again: 4551 Kelvin, Tint: +10, Saturation: -6. That means that I'm almost back to the standard for moon lit nights. Notice that the clouds are just white, no orange tint. That is because there are no street lights that can compete in brightness with the moon.
One night, four photographs, four different WB setting.
This shows how there is no one right setting for Aurora photography. The changing light can sneak up on you. the human eye adjusts without you noticing it. It also shows the importance of shooting in RAW so that it is possible to change the settings in Lightroom, Photoshop or any other application afterwards. Even if you do tests and think it looks good on the screen on the camera, the safest thing is always to shoot RAW.
The two first photos could have been worked more in Lightroom. I could have brushed the clouds and the mountains less orange/more blue. That would have looked better and more natural. I could also have taken out some saturation in the orange parts. I think that I wouldn't have taken out all the orange tint, but some, just to make it less distracting. Other photographers and viewers of the photographs that I've put here would maybe disagree with the setting I've chosen. That's OK. There is no absolute when it comes to white balance.
No comments:
Post a Comment